SELECT MENU
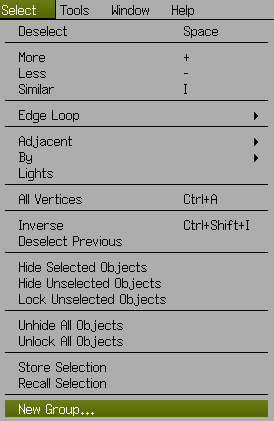
 The Select Menu contains many commands that enable efficient modeling in Wings 3D:
- Edge loops and edge rings are key concepts in mesh modelling – see Edge Loops.
- There are tools to “Select By…” different types of item and criteria.
- Selection Groups allow you to store and manage named sets of selected items which can be edges, faces or vertices.
By being able to select only those sets of items you need to work with, and even combine (or subtract) a selection with another selection set, you can more quickly achieve the results you desire.
Some of the more frequently used Select commands are available via Hotkeys, or via the Geometry Graph window, so a lot of the time you may not need to call down this menu. But there are some advanced selection criteria available which are useful when the model becomes complex.
Select | Deselect (Space)
Deselects all selected items and exits selection mode.
Note: Almost redundant as a menu command: you will find that the Space bar is a useful Hotkey!
Select | More (+)
Grows the selection set to include all the adjacent items of the same type on a given object, depending on current selection mode (vertices, edges, or faces). For example, if a face is currently selected all adjacent faces will become selected as well. Works closely with the [Select | Adjacent] command and the V,E,F,B Hotkeys.
If there are multiple objects in a scene, it will not cause more objects to be selected. However, each object with a selection set active will have its selection set grow.
Select | Less (-)
Shrinks the selection set in reverse order of its growth. If working with an initial selection set, this will cause nothing to be selected. As with [Select | More], selection sets on multiple objects can be manipulated at the same time. Works closely with the [Select | Adjacent] command and the V,E,F,B Hotkeys.
Note that Less does not deselect items selected via Similar; i.e. it does not revert to the original selection set.
Select | Similar (I)
Select all similar vertices, edges, faces or objects to the currently selected items. Depending on selection mode, the rules for similarity are as follows:
- Face mode – Same number of edges. Sum of edge lengths approximately equal. Sum of angles between each pair of edges approximately equal.
- Edge mode – The length of edge, and the angle and length of the nearest four edges approximately equal.
- Vertex mode – Angle and length of edges going out from the vertex approximately equal. (This may be the least useful of the bunch, as it seldom finds many hits).
- Object mode – Only objects with the same number of edges, faces and vertices.
 When in Face mode, additional ‘Select Similar’ commands appear in the Menu, each of which has an optional dialog to tune your selection:
Select | Similar Normals
Select all faces with similar normals, within an angle tolerance.
Select | Similar Area
Select all faces with similar area, within an area tolerance.
Select | Similar Material
Select all faces with similar material, or optionally similar vertex color.
Note: [Select | Similar] is not that useful for organic modeling. Its main strength is in what Jakob Cederlund calls geometric art (i.e. objects that are highly symmetrical). It is good for selecting faces widely apart.
Select | Edge Loop
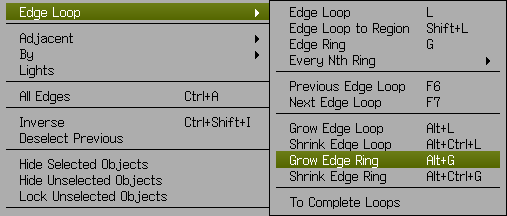
This command opens the Edge Loop submenu. Each subcommand switches to edge mode and operates on the selected edge(s).

- Edge Loop (L)– For each selected edge, continues the edges that flow in a line around the object, or until a pole is encountered. A pole is defined as a non-4 way intersection (i.e. it has 3 edges or 5 or more edges joining at a single vertex).
- In Vertex mode, edges connecting adjacent vertices are selected, and selection mode switches to Edge mode.
- In Face mode, the command switches to edge mode, then select all edges around the selected faces only.
- Note: When selecting the edge loop Wings 3D will traverse an intersection which has an even number of edges connected, i.e, it carries “straight on” across the intersection.
- Edge Loop to Region (Shift+L)– Switches to Face mode and selects all the faces contained by an edge loop.
- Works only with a properly selected closed edge loop. If a single edge is selected, or if the edge loop is not closed, then all faces become selected.
- Handles multiple edge loops. For example, you could select edge loops such that both hands or both legs of a body are selected.
- Edge Ring (G)– Selects a set of edges adjacent to the selected edge that run between two edge loops. These cross edges are sometimes referred to as “struts”.
- The edge ring selection continues until the model is completely encircled, or until a pole is encountered.
- Every Nth Ring – Same principle as the Edge Ring command, but opens a submenu to allow you to specify second, third, Nth ring.
- Previous Edge Loop (F6) – Selects the next closed edge loop “down” the model, deselecting the current edge loop. Repeated use of F6 continues down the model until it no longer finds another loop to select, then it reverses order and comes back up the model.
- Next Edge Loop (F7) – Works just like F6, except it goes in the opposite direction, so that you can use the two function keys to toggle back and forth between two edge loops, or change directions at will.
- Grow Edge Loop (Alt+L) – grows the edge selection by one edge in each direction of the loop(s).
- Shrink Edge Loop (Alt+Ctrl+L) – shrinks the edge selection by one edge in each direction of the loop(s).
- Grow Edge Ring (Alt+G) – grows the edge selection by one edge in each direction of the ring(s).
- Shrink Edge Ring (Alt+Ctrl+G) – shrinks the edge selection by one edge in each direction of the ring(s).
- To Complete Loops – switches to edge mode and for each selected edge completes the edge loop(s).
Select | Adjacent
Switches the selection mode and grows the scope of the currently selected items depending on the choice of mode in the submenu. Note: the Hotkeys V, E, F and B are easier to use here. The selection will grow each time you call the command or press the same Hotkey.
Note: If there is no current selection set then the Hotkeys simply change selection mode.
When switching modes, just what is selected can be subtly different. Try the commands or Hotkeys out on a Grid object to understand the differences.
- In vertex mode – [Select | Adjacent | Vertices] or V Hotkey will grow the selection in exactly the same way as does [Select | More].
- In edge mode – [Select | Adjacent | Edges] or E Hotkey will grow the selection by selecting the four edges nearest each edge. [Select | More] on the other hand will select all edges that share a vertex with a selected edge.
- In face mode – All faces that share an edge with a selected face will become selected. [Select | More], on the other hand, will select all faces that share a vertex with a selected face.
Select | By
This command opens the Select By submenu, which offers a wide variety of methods to choose selection sets.
 These selections can be stored as selection groups and then used in conjunction with other selection sets via Union, Subtract, and Intersection commands (see below).
- Hard Edges – Selects all hard edges in the selected object.
- Isolated Vertices – Selects all isolated vertices, i.e. vertices with only two edges connected to them. Isolated vertices cause problems in a wings model and should not be there, but some actions or imports may produce these artifacts which need to be removed.
- Non-planar Faces – Selects faces which do not appear to be “flat”. Non-planar faces are not usually a problem, but for some extreme cases there may be distortion when displaying or smoothing because of ambiguity. Most faces in organic models tend to be non-planar.
- Vertices With – Selects faces that have a specified number of vertices. This is helpful in trying to maintain quads.
- Faces With – Selects faces that have a specified number of edges. You can quickly find any non quad or tri-sided polygons. Such polygons can cause problems in some 3D modeling and rendering packages and should therefore be resolved.
- Non Quadrangle Faces – Selects faces that are non-quads. Optionally, select even or odd non-quads. Similar to other sub-commands above.
- Random – Selects a specified random subset of the current selection type (vertices, edges, faces or objects) for manipulation.
- Short Edges – selects any edges that are too short, as specified by the option . Short edges are often responsible for display anomalies and difficulties in modeling. Often these edges will be so short or located such that you can not see them, even after selecting them. You can Extrude them to find them, or simply Collapse them to eliminate them.
- Sharp Edges – Selects any edges that are sharper than a given angle, specified as either peak (acute) or valley (obtuse), or both.
- Vertex Path – Selects a set of vertices along a path, using fewest or shortest number of edges.
- Material Edges – Selects all edges between different materials.
- UV-Mapped Faces – Selects all edges that have UV coordinates.
- Id – selects an item, depending on selection mode, by its ID number, which can be seen in the Wings 3D Status Bar when the item is selected. So, if you record an ID number you know you want to come back to, you can later Select it then Aim at it to continue working in that area.
Select | Lights
Will select all the lights in your scene.
Select | All {items} (Ctrl+A)
Depending on the current selection mode, selects all the vertices, edges, faces, or objects. In Object Mode, it selects all objects within the scene that have not been hidden or locked.
Select | Inverse (Ctrl+Shift+I)
Inverts the selected set in the current Selection Mode. What is selected becomes unselected, and vice versa.
Select | Deselect Previous
Subtracts the previous selection state from the current selection. That is, as you grow a selection in steps, this command allows you to remove the previously selected items from the current selection.
Select | Hide Selected Objects
Selected objects become invisible. This command works in any mode, so it will include any objects that have any vertex, edge or face selected. This is the same as the Eye icon in the Geometry Graph.
Select | Hide Unselected Objects
All objects that are not selected become invisible. This command works in any mode, so it will include any objects that have no vertex, edge or face selected. Useful for temporarily removing clutter from the scene. This is the same as the Eye icon in the Geometry Graph.
Select | Lock Unselected Objects
All objects which are not wholly or partly selected are locked. While locked, these objects cannot be selected or manipulated. This is the same as the Lock icon in the Geometry Graph.
Select | Unhide All Objects
All previously invisible objects are made visible. This is the same as the Eye icon in the Geometry Graph.
Select | Unlock All Objects
All previously locked objects are made free. This is the same as the Lock icon in the Geometry Graph.
Select | Store Selection
Depending on the selection mode, stores the current selection of items into the selection group named “StoredSelection”. This group holds separate selection sets of vertices, edges, faces and objects (i.e., they do not need to be from the same part of the model).
The command overwrites any previous selection held in this group for the current selection mode. If nothing is currently selected in this mode, say, Face mode, then the command will clear the saved selection for that mode.
Select | Recall Selection
Recalls the selection from the “StoredSelection” selection group. The type of items recalled will depend on the current selection mode.
Select | New Group
Create a named (empty) selection group.
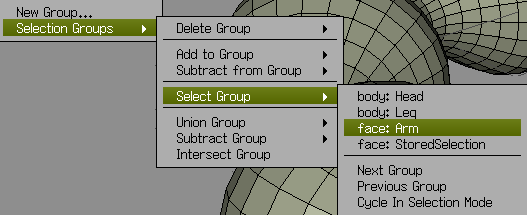
Select|Selection Groups
Opens the Selection Groups submenu to manage the selection groups that have been created in this model. This command only appears if any selection groups have been saved, (either the “StoredSelection” group or a named selection group) and remains in the Select menu until all selection groups have been deleted.
Note: you can see the stored selection groups listed against each subcommand.
- Delete Group – removes one of the named groups.
- Add to Group – adds current selection of items to the named group, allows selection group to be modified.
- Subtract from Group – removes the current selection of items from the named group.
- Select Group – recalls the selection group; depends on the current selection mode.
- Union Group – creates a new selection set by combining the current selection set with one that has been stored.
- Subtract Group – Creates a new selection group by subtracting the stored selection group from the current selection group. That is, all items in common between the two groups are deselected from the current selection group.
- Intersect Group– creates a new selection set intersecting the current and stored selection sets. That is, only those items that are common to both sets remain selected. For example, this can be used very effectively to add noise to an organic model:
- Store all the vertices on a model of a tree trunk.
- Select Vertex mode and [Select | By | Random | 30%] which will select a random set of vertices on trunk, branches and leaves.
- [Select | Intersect Group] – only random vertices on the trunk will remain selected.
- Now [Vertex | Move | Normal] to make knobs.
