VERTEX MENU

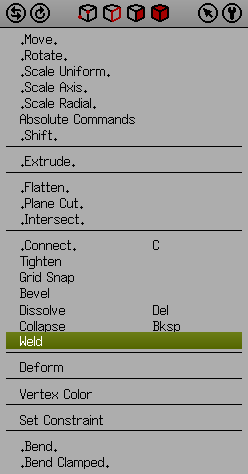
If one or more vertices are selected, RMB in the workspace will bring up the Vertex Menu. This will allow you to perform operations unique to vertex manipulations.
When selecting commands, different sub-menus can be invoked depending on which mouse button is used. Generally, the basic option is chosen by LMB, while the more “advanced” options are chosen by MMB or RMB, and possibly with additional modifier keys. The information Line will show the available options, and will also guide you through dialogs to select reference points, axis, etc., or input numerical coordinates.
Vertex | Move
Moves the selected vertex/vertices along a chosen axis, or with magnet.
Vertex | Rotate
Rotates the selected vertex/vertices around a chosen axis, or with magnet. At least two vertices must be selected for this to have any effect at all. Vertices will rotate about one center of mass for the entire selected set whether or not they are adjacent. Note that the way this works for vertices is fundamentally different from how faces or edges rotate.
Vertex | Scale Uniform
Scale selected vertices uniformly from a chosen point, or with magnet. Requires two or more vertices to have any effect. Scale operations work based on the center of mass of the selected set.
Vertex | Scale Axis
Scales the vertex/vertices along a chosen axis, or with magnet.
Vertex | Scale Radial
Scales the distance between the selected vertices radially, i.e. holds one axis constant while allowing scaling in the other two.
Vertex | Absolute Commands
Opens dialog box for operations on selected vertices:
- Move – Move selected vertices to exact position in absolute coordinates.
- Snap – Move selected vertices guided by chosen reference points.
- Scale – Scale selected vertices by exact amount, or guided by chosen reference points.
Vertex | Shift
Moves selected vertex/vertices along chosen paths. The constraints of the pathways may be set to be Planar, Spherical or Cylindrical
Vertex | Extrude
Extrudes a ‘spike’ from a selected vertex/vertices along a chosen axis, thus creating new faces. During the extrusion process, you can use LMB to change the size of the extruded spike’s base.
Vertex | Flatten
Flattens the selected vertices by averaging their position with reference to a chosen plane. Requires two or more vertices to have any effect.
Vertex | Plane Cut
Takes a vertex selection and a plane, asks for a Face or Body selection, then cuts that selection at every vertex of the original selection.
Vertex | Intersect
Moves the selected vertex/vertices to the intersection point between a line and a plane.
Vertex | Connect (C)
Connects selected vertices with edges if they have a common face, or if the faces between vertices is contiguous. More than one set of connects can be performed at a time. Some applications require triangles, rather than quads on import. You can convert your Wings 3D quads to triangles very simply by selecting the Object (Body), then pressing V to switch to vertex mode. All vertices on the model will then be selected. Then just do a Connect, and all the quads will be turned into triangles.
Vertex | Tighten
Averages the positions of the selected vertices, taking into account the vertices that surround the selection. Tighten deserves a bit of explanation as it is not immediately obvious just what it does. Tighten looks at each vertex and works out the direction they need to move in so as to create the most tension-free surface, that is, it tends to average the vertices. It then allows you to interactively move those vertices along that direction by dragging the mouse left and right.
Another way to think of it is as a tool to get all the edges as similar in length as possible. It will eventually smooth out your model into an amorphous blob.
You can use it to gently smooth out regions where you’ve made changes in the surface too harsh, by tightening select areas by small amounts.
You can get your model into a more UV-friendly, paintable state by tightening a lot, thus avoiding areas where there’s overhang or creases.
Alternatively, you can tighten in the opposite direction (un-tighten) by small amounts where your surface is too smooth. It will make differences in edge length more extreme. If you find a model is coming out too gooey when smoothed, un-tighten it a bit before smoothing, it might help.
Vertex | Grid Snap
Snaps each selected vertex to the closest point on a virtual grid as you drag to increase or decrease the grid’s increment.
Vertex | Bevel
Bevels corners at selected vertices, thus creating new faces in place of the vertices. It has no effect on isolated vertices where two edges fail to intersect with any other (a single edge cut in two). Such vertices should be eliminated, by the way, via the Collapse tool.
Vertex | Dissolve
Removes the vertex/vertices. Unlike Collapse, Dissolve leaves you in Vertex Selection Mode so that you can continue to select and eliminate vertices without having to switch back from Face Mode.
Vertex | Collapse (Bksp)
Removes the vertex/vertices, adjusting the faces and edges associated with it accordingly and leaves you in Face Mode.
Vertex | Weld
Joins two vertices connected by a single edge.
Vertex | Deform
Wings 3D has several deformation tools available, as listed below. When used with care, these can produce interesting effects on your model – see examples and tips below. The Information Line shows the available options for deforming along standard and non-standard axis.
- Crumple - Moves selected vertices randomly. Good for adding “noise”.
- Inflate - Moves selected vertices along their normal out from the center of mass of the selection. If you have a hollow object and select vertices on the inside as well as the outside of the object, Inflate will cause the vertices on the inside and outside to move outward just as if you were inflating a balloon. In other words, the outside vertices move on their positive normals while the inside vertices move on their negative normals. This can be a very powerful modeling tool. Note however that Inflate can cause faces to collide with each other, and can therefore ruin a model rather quickly. Be judicious in its use, especially in areas of dense geometry that may be oriented towards other parts of the model.
- Inflate Cylindrical – {? ?}
- Taper – Spreads the vertices apart radially along the selected axis. Note that the reference point for the Taper operation is at the middle of the model.
- Twist - Twists the selected vertices around an axis parallel to the chosen standard axis. The axis will be pass through the center of bounding box for the selected vertices. Note that the ‘anchor / stationary’ end of the model always faces the negative side of any axis chosen. To twist round the other way, the model has to be rotated 180 degrees first.
- Torque - Twists the selected vertices around the chosen standard axis. Note that as with standard Twist, the ‘anchor / stationary’ end of the model always faces the negative side of any axis chosen. To twist round the other way, the model has to be rotated 180 degrees first.
- Shear – {? ?}
Vertex | Vertex Color
Opens a dialog box where you can specify a color for the selected vertices. The specified color is strongest at the target vertices and fades out towards surrounding vertices. Note: A vertex cannot have a color and a UV coordinate at the same time.
Vertex | Set Constraint
{? ?}
Vertex | Bend
Bend is a family of tools that deforms the selected vertices along a curve. The type of bending deformation depends on the mouse button used: Plastic, Pivot and TopRad. [See Bending]
Vertex | Bend Clamped
The Bend Clamped command has similar functionality to Bend, but lets you set limits for rod curvature. Also, there are additional points specified to clamp the curve. [See Bending]
Some Deformation Examples
(Björn Gustavsson)
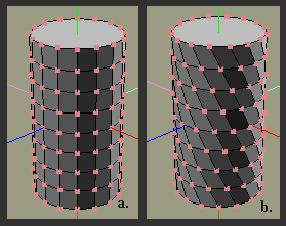
In the image below, a cylinder placed in the center of the workspace (a) exhibits exactly the same result (b) when subjected to either [Vertex | Deform | Twist | Y] or [Vertex | Deform | Torque | Y]. Both will twist the cylinder around the Y axis, because the cylinder is exactly centered in the middle of the workspace.
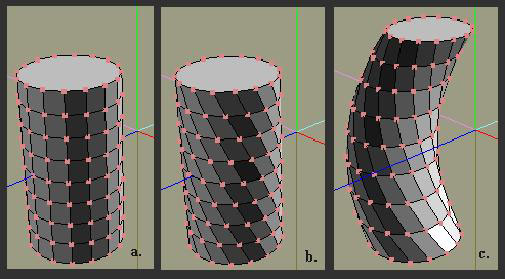
If the elements are off-center, the results are completely different. In the image below, a cylinder is moved off center in Z by 1 unit (a). Then a [Vertex | Deform | Twist | Y] by 180 is applied, which twists the off-center cylinder around a vertical axis passing through the center of the cylinder. The result is exactly as in the image above.
An [Edit | Undo] converts it back to a standard cylinder (a), and then [Vertex | Deform | Torque | Y] by 180 is applied, which twists the cylinder around the workspace Y axis, yielding different results.
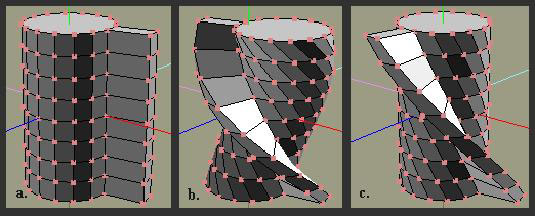
You can achieve dramatically different results between Twist and Torque on asymmetrical objects. In the example below we have a cylinder that is centered in the workspace. One set of faces has had [Face | Extrude Region | Normal] applied to make the object asymmetrical (a).
In (b) we have applied a [Vertex | Deform | Twist | Y] by 180 degrees. You can see that it caused the cylinder itself to become bent.
In (c) we have applied a [Vertex | Deform | Torque | Y] by 180 degrees and get an interesting screw like object with a straight shaft.
Quick Tip: Experiment with Deformers
(PuzzledPaul)
Deliberately moving models off-center and experimenting with Twist and Torque can give ‘interesting’ results. In my opinion, ensuring you have sufficient ‘sections’ along the length of your model is essential for producing satisfactory results. For non-organic/technical models, careful choice (and matching) of the number of linear and radial sectors can result in geometry that offers considerable scope for polygon reduction after twisting is complete. Experimentation and keeping away from prime numbers can pay dividends in this area if low polygon counts are needed.
Rotating the model off a main axis and twisting at right angles to the models main axis can often prove an entertaining (and fruitful) exercise. If you want to ‘dirty up’ an object that’s been twisted (for maybe a more ‘organic’ look) try selecting sections of the twisted item (rather than the whole) and re-applying a bit more twist.
Taper operates from the center of the selection set along the axis chosen. One end will Taper up while the other end Tapers down. Like twist, experiment with selecting parts rather than the whole of the model – it is quite easy to get useful shapes this way. Successive applications of taper should also be tried – e.g. tapering a multi-sectioned cylinder 100% in Y and then repeating the op will produce a concave spike, like a Chinese hat whereas, if you perform the second taper by -100% you get a beer barrel shape.