VIEW MENU
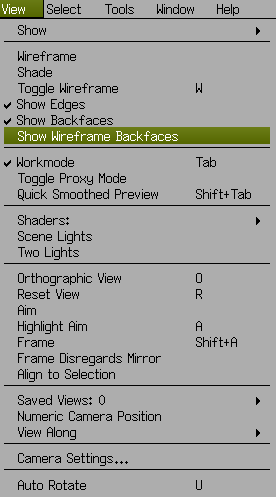
The View Menu contains functions that control how your work is displayed, i.e. camera views and workspace settings.


View | Show
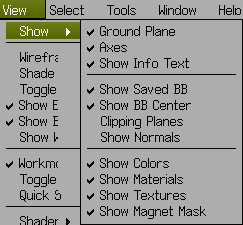
Opens the Show submenu which has commands to toggle display features on/off.
These settings apply in the current Geometry window, so you can adjust the secondary views of the scene to remove clutter, etc.
- Ground Plane – Show the Ground Plane, i.e. grid. Also available Show/Hide Ground Plane icon the Icon Bar.
- Axes – Show the coordinate axes. Also available as Show/Hide Axes icon on the Icon Bar.
- Show Info Text – Show the Status Bar in this Geometry window.
- Show Saved BB – Display any saved bounding box.
- Show BB Center – Display the Center of any saved bounding box.
- Clipping Planes – Toggles extra clipping planes (uses default axes).
- Show Normals – Show the normals for the selected elements in Vertex, Edge or Face mode. These are displayed as short lines; see [Preferences | General | Normals Display] to adjust how these appear.
- Show Colors – Show vertex colors.
- Show Materials – Show materials.
- Show Textures – Show textures.
- Show Magnet Mask – Show the Magnet Mask.
View | Wireframe
Sets/unsets the display mode of currently selected objects to wireframe. If no objects are currently selected then all objects are set/unset.
If want to extrude a face into the model, set your model to wireframe mode first and you will be able to see how far into the model you are going.
View | Shade
Sets/unsets the display mode of currently selected objects to solid flat shading. If no objects are currently selected then all objects are set/unset. Toggles between smooth shaded view and solid view on your model. In smooth shaded view the materials being used become visible. This is sometimes referred to as a Wings render.
View | Toggle Wireframe (W)
Toggles between wireframe and shaded views of the selected objects.
Note that when working with mulitiple objects some can end up in the alternate view mode. To reset, deselect all then set [View | Wireframe] so that all objects are in the same mode.
This is a useful toggle to use in conjunction with the Tab Hotkey. Tab will show you a temporarily smooth-shaded version of your model which you can then overlay with the wireframe by hitting the W Hotkey. This ‘wire on smoothed view’ can be helpful to see how edges affect the overall form of the subject while modeling.
View | Show Edges
In flat shaded mode, toggles the edges on/off. This can be useful for very large models, as some otherwise fast graphics cards display edges slowly.
View | Show Backfaces
Show visible backfaces when viewed through a hole or hidden faces in an object.
View | Show Wireframe Backfaces
Lets you see through the wireframe so that both front and back (normally hidden) edges are visible in wireframe mode. This can be very useful when trying to position edges to match up on the inside and outside of a wall, for example, prior to using Bridge to cut in a window.
View | Workmode (Tab)
Toggles the display between work (flat) mode and smoothed mode. Also available as Show Flat/Smooth Shading icon the Icon Bar.
View | Toggle Proxy Mode
For the selected Object(s) only, performs one level of smoothing on a temporary basis and shows what the object will look like after smoothing. You cannot model the object(s) in this mode.
View | Quick Smooth Preview (Shift+Tab)
Sets the view mode to shaded and performs one level of smoothing on a temporary basis so that you can see what your model will look like after smoothing. You cannot model in this mode.
View | Shaders:{current setting}
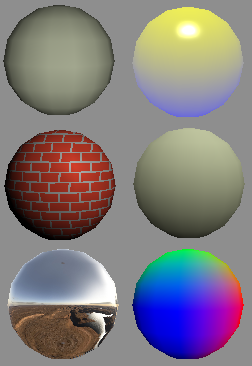
 Opens the Shaders submenu, to change the shader from the default to one of 12 built-in options.
Some examples are shown here:
- Hemispherical Lighting
- Gooch Tone
- Toon
- Brick
- Environment Mapping
- Vertex Normals Color
- Face Normals Color
- Spherical Ambient Occlusion
- Depth
- Spherical Harmonics 5
- Spherical Harmonics 8
- Spherical Harmonics 9
View | Scene Lights
Turns on/off any lights you may have added to the scene via the Lights primitive.
View | One/Two Lights
Toggles between one and two standard lights switched on in the scene. Note that setting Scene Lights negates the One Light/Two Light option.
View | Orthographic View (O)
Switches between Orthographic and Perspective views. Also available as an icon on the Icon bar.
Orthographic views are the same as those traditionally used for engineering or technical drawing purposes i.e. front, side and plan views. Since there is essentially no single point of view (as in perspective) all lines and faces are seen in their true lengths and shapes – provided they lie on a plane that is at right angles to the viewing direction. This can offer an advantage when moving or editing geometry that, for example ‘bulges out’ towards the viewer.
The use of Orthographic View is well married with the use of [(Item) | Move | Free], allowing you to freely move selected items while automatically constraining such movement to only two directions at a time. For example, if you set the view to orthographic, view along the Z axis, then edges can be moved in the Y and X axes only.
View | Reset View (R)
Resets the camera view to default location and zoom settings. Great if you get lost!!
View | Aim
Points camera directly at the selected item. Then, when you pan and zoom in on the selected item, it will stay centered in the work space. If there is no selection, the aim point will be reset to the origin {0, 0, 0}.
This is very useful when doing detailed work and for doing high aspect ratio stuff, such as a giraffe. When working on the head, select a face on the head and Aim; all camera movement will be centered on the head. Then, when working on a foot select a face there and Aim – now the point of focus will be on the foot.
View | Highlight Aim (A)
Aim the camera at mouse-over highlight.
View | Frame (Shift+A)
This works similarly to [View | Aim] except that it adjusts the distance to the selection so that the selection will be visible in the Wings 3D window.
If there is no selection, the distance will be chosen so that all objects will be visible.
If virtual mirror is in use, then the view symmetrically frame elements.
View | Frame Disregards Mirror
Same as [View | Frame] except that the view ignores the virtual mirror if that is enabled.
View | Align To Selection
Turns the camera to view along the normal of the selected item.
This can be very useful if a single (flat) face is selected and [Align to Selection] is used. The face is then seen in its true shape, since the viewer is looking at it from a right angle. Selecting geometry forming that face (edges or vertices) and using [Move | Free] (for example) allows movement on the same plane as the face. This keeps the face flat, which is required for clean geometry.
This is also useful in situations where you want to maintain a reference face, so that other geometry not linked to that reference face can easily be moved on planes parallel to the reference face. To accomplish further editing of this ‘external’ geometry, select the reference face, use [Align To Selection], and the model re-aligns to the correct position.
For example, [Align To Selection] can be used on a flat face, then an edge can be Cut by 2 to create a new vertex. It is then possible to ‘slide’ the new vertex along the edge to a new position. The edge can either be kept straight via vector moves or ‘distorted’ by moving the vertex accordingly to form a new apex. In either case, by first using [Align To Selection], the face will remain flat.
Similar operations can be preformed via other methods as well, such as the Slide plug-in.
View | Saved Views: #
Opens the Saved Views submenu. Allows you to save the current camera position in a list, to chose from the list and return to that position.
View | Numeric Camera Position
Opens the dialog box to set the exact coordinates of the camera’s position, focal point, zoom and pan. This position can be saved and then recalled as a saved view.
View | View Along
Opens the View Along submenu to set the camera to view along the selected axis, to quickly switch the view around the model to check it’s as you intend. The view along camera command uses the current Zoom and Pan settings. This is more easily done using the Hotkeys, that is:
- X – from the right side. Shift+X – from the left side.
- Y – from the top. Shift+Y – from the bottom.
- Z – from the front. Shift+Z – from the back of the model.
Look at your model from various angles as you go, to get a good feel for how it is developing. It is also very useful to view along a major axis while scaling, as you can scale two vertices along a cross axis to spread them apart or move them towards each other. Use with orthographic mode for certain tasks where precise movement / alignment is required.
View | Camera Settings
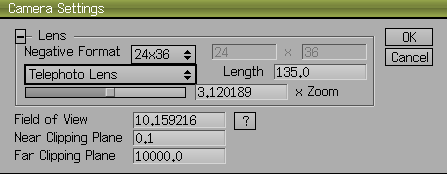
Opens the Camera Settings dialog to change the type of lens and to set the camera view parameters. The settings are stored as preferences and are used as the default camera view.

- Lens– Lets you choose different camera formats:
- Negative Format – 24×36, 60×60 or Custom.
- Type of Lens dropdown menu – Choice of Wide-angle, Moderate Wide-angle, Standard Lens, Portrait Telephoto Lens, Telephoto or Custom.
- Lens slider bar – Provides fine control over the type of lens effect.
- Field of View – The angle from lower to upper border seen from the camera.
- Near Clipping Plane – Distance from the camera position from which the Wings 3D renderer will display the scene. Default is 0.1 wings unit.
- Far Clipping Plane – Distance from the camera position up to which the Wings 3D renderer will display the scene. Default is 10,000 wings units. This is effectively the rendered depth of field.
Default values for Focal Length, Zoom and Field of View are set for the lens type and negative format options. The custom lens and negative format options allow you to change these values, but Wings 3D will adjust the values so that they remain consistent.
View | Auto Rotate (U)
This will fly your camera around the model, so that it appears to rotate around the origin. The speed of rotation is changed by the + and – keys. To change the aspect of the camera:
- Start Camera mode with MMB.
- Move the camera view to the new aspect (with the mouse or with the X, Y, etc View keys).
- Accept the new view with LMB and the rotation will continue.
- LMB stops the rotation.
Auto Rotating gives you a good overall view of the model, and can be used in conjunction with screen capture software to create an AVI to show off your model.
Quick Tip: View Orthographic in Wireframe Mode
Sometimes it is not all obvious what the difference is between orthographic and perspective views. To see this graphically:
- Create a cube and hit the X Hotkey to look at it straight on, from the right side.
- Hit the O Hotkey a couple of times, to switch between orthographic and perspective views. It does not seem to do much other than change sizes, right?
- Hit the W Hotkey to put the cube into wireframe mode and repeat the exercise. You can definitely see the effects of perspective now, even when looking dead on.
- Use the marquee select function (drag a box) to select the top left vertex of the cube while still in perspective view. You get one vertex selected.
- Clear the selection and go into orthographic view – O.
- Select the top left vertex via marquee drag.
- Rotate the camera a little and you will see that you got both the front and back vertices because you were in orthographic view.
This can be very useful when you are working on a complex but symmetrical, or nearly symmetrical model. To get the vertices of, say, the left and right thumb, you can go into orthographic view and use a marquee select to get both sets at once.